Sunday, 27 December 2015

Sydney blush

This top is a huge surprise to me - I wasn't sure about the fabric, the pattern and their combination! This beautiful rayon piece came from Tessuti Fabrics in Sydney - I absolutely loved the shop but the prices were a bit out of my range. Because of that I only got 1,5m of this blush-pink and grey fabric and I'm not even sure why! I usually don't go for pale colours and I wasn't sure if they would work on me.


The pattern comes from Burda. Blouse 131 from May2014 magazine and I've been meaning to sew it for a while. I remember I had it traced at some stage and even the fabric was cut but I can't seem to find it anywhere! Anyway, the weekend before Christmas I decided to make myself a new top ;)


I had to do my standard 5cm full bust adjustment and I added it to the shoulder gathers. I used burrito method for the yoke as I love the clean finish it provides! After trying the top on I decided to take it in a little bit - I think 3 cm on each side. It sits nicer now.  While sewing the top wasn't too hard I must admit that Burda instructions are ridiculous! "Construct sleeve vents" or "attach the neckband" are the perfect example. Really Burda? A little bit more a hand holding would be welcomed here. Luckily the week before I made continuous sleeve placket so I knew what to do. The neckband was a bit of a trial and error. I machine stitched one side and the stitched the other side by hand. Because of that I had more control over the pointy ends of the neckband. It's not perfect but not too bad either.


I used some white pearl buttons from my stash and surprisingly my sewing machine had no problems with the button holes! I also realized I don't have to unbutton the blouse to put it on so I stitched the overlapping neckband pieces together (after the photos were taken) as it was gaping a little bit. I hemmed the top using my rolled hem foot - I need a bit more practice with it as the hem is a bit uneven.
Overall I think I like this top. I was worrying that the gathers in the bodice and puffy sleeves wouldn't look good on me but they somehow work. Even the colours seem to be ok and I think this top will be perfect for summer. And it will work well as office wear once I start working again ;)


Thursday, 24 December 2015

Christmas dress

Ok, this is definitely my favourite project of 2015! I love absolutely everything about it!


Let's start with fabric. I bought this beautiful linen in Made on Marion - the most lovely local store for all sorts of crafters during their mid-winter Christmas celebrations. I couldn't resist this white and blue print. It reminds me of portuguese ceramic tiles called azulejos which I got to love when I lived in Portugal for 6 months. I bought 2,5m with no projects in mind but I thought it was going to be a dress or maybe a summer jacket. Then I started thinking about Christmas and the idea was born.


I decided to use the same patterns as for my Halloween dress - Simplicity skirt and Burda bodice. I modified the bodice neckline from sweetheart shape into a straight one. I thought it suited the fabric more. Unfortunately I didn't do it properly - the neckline didn't sit flat. I also realized that only when the dress was practically finished! The dress went to the naughty corner for two weeks, then I got back to it and fixed it in 20 min! It is almost perfect now ;)


I didn't want any stitching to be visible on the outside and I also wanted this dress to be pretty on the inside. I finished all the bodice seams with bias binding, hand-stitched it down using blind stitch. It took me a few episodes of "Jessica Jones"to finish it (I do recommend the show, David Tennant is a fabulous villain!). I opted for narrow, rolled hem. I am really proud of this dress!
I wish I had better photos of the dress - taking photos around noon on a sunny day made them overexposed and some details are hard to see.


Monday, 21 December 2015

I HEART Cardamome

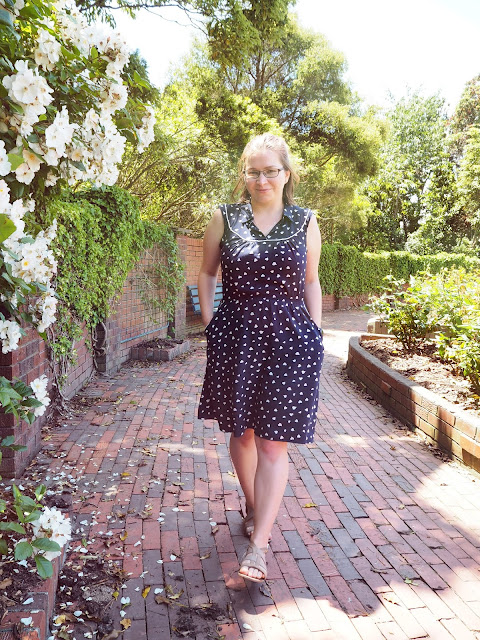
The moment I finished my first Cardamome dress I knew it wouldn't be my last. I like the unusual lines of the dress and the fact that it has loose fit but the shirring keeps it close to my waist - very comfortable and flattering.


The fabric is one of my souvenirs from September trip around the North Island. The last stop was in Masterton where I bought this lovely navy rayon covered in hearts. It was a pleasure to sew with it! Even cutting wasn't a problem. I decided to use piping again, this time white so it matches the hearts. The dress quickly became my "to go dress" when I have no idea what to wear!


The photos were taken at our WBSN Christmas Picnic. It was perfect - weather was lovely, food was yummy and the company as amazing as always ;) We also had our ornament swap and I received the most beautiful cross-stitched kiwi! Handmade swaps with WSBN ladies are always amazing because everyone is so crafty and clever!


And my beautiful hand made ornament. Isn't it lovely?

Tuesday, 8 December 2015

Cover dress

Ever since I saw the McCall's 7084 I wanted to make the cover dress - stripes, sleeves and a full skirt. Finding the right fabric took a while but I managed to grab 2,5m of cotton/elastane stripes in navy and white, although I could have sweared that they were black when I bought the fabric! Anyway, navy is nice too.


2,5m wasn't quite enough - the pattern cover suggested 4,7m! I guess it's because of placing parts of the pattern on bias. To make it work the only change I had to make was narrowing the skirt inserts. They ended up being almost half the original size. It's actually quite fortunate - I would't want to have it any fuller.


It took me a while to finish this dress as I decided to do some fancy finish. Every seam allowance was folded over and topstitched. I lined the stripes where needed. The waist seam is finished with mint bias binding - it adds a pop of colour that makes me happy every time I wear this dress. There are pockets and sleeve tabs and even a label! I even managed to find navy press snaps to match the colour of the stripes so I could avoid buttons and buttonholes.  I think this might be one of my favourite makes this year!


Monday, 23 November 2015

Simple T-shirts (and the patterns are free!)

Who doesn't like free patterns? I surely do! First top is Kimono Tee from Maria Denmark - free when subscribed to her newsletter. It is a very simple, two-piece pattern. The only thing I changed was doing an FBA and then removing the dart using this tutorial. I used some kind of viscose blend knit fabric I got from The Fabric Store. Sewing was a breeze - four seams, hems finished with twin needle, the neckline finished with a neckband. I really like this top and the pattern itself! I've been wearing it at least once a week since I made it in August :)


Maria Denmark


This one is a free pattern from Grainline Studio - Hemlock Tee. Same deal - you need to subscribe to a newsletter to get the pattern. Hemlock comes in one size only (42" bust) and it is supposed to be a boxy, oversized tshirt. I took the sides in to make it a closer-fitting top. All edges are finished with a twin needle. I used some mystery gold/ivory striped knit - one of my scores from The Fabric Warehouse sale 2 years ago - I love their sales!!!

Grainline Studio


Sunday, 1 November 2015

Halloween dress

I'm not really good at making costumes. I usually have the perfect idea months before so I always think I have sooooooo much time... Yeah, right. I can almost never finish costume in time!


This year I decided to do what I do best and make myself Halloween themed dress. I found this cute fabric at good old Spotlight and the price was reduced to $8 per meter. Such a score! The top part is pattern number 115 from Burda 4/2013. I used that pattern to make my first dress ever and you can see it here. The skirt is Simplicity 1880. The only changes I made was adding the back seam and moving the zip from the side to the back. The neckline is finished with bias tape (and i totally forgot to take photos of it!) and I used my rolled hem foot to finish the bottom.


Another thing I made is barely visible on the photo - a petticoat! I used fluorescent yellow nylon net and matching thread and an elastic from my stash. I never made petticoat before but it was piece of cake especially when using gathering foot. I left the hem untouched - I didn't want to waste time binding it as it's not something I will wear on regular basis. Nylon net is a bit scratchy so if I ever need another one I'll probably just buy a tulle petticoat ;)


I wore this outfit to drinks with WSBN girls and went to a Halloween party after that. Almost every girl in the room came to tell me that my dress was amazing and ask where I got it from. It was really satisfying telling them that I made it myself! It's such a pity this dress can only be worn around Halloween :(

PS. Sorry for the smudged photos - I haven't realized my lens was dirty!!!!


Here is a crappy photo of my petticoat - I found it hilarious that it was standing on its own!